How to Lay Artificial Grass on Soil: The Complete 2025 Guide
Tired of muddy spaces, endless maintenance, and patchy lawns? Artificial grass offers a vibrant, low-maintenance solution for commercial properties, public areas, and residential landscapes alike.
However, success depends on proper installation—especially on soil, where thorough preparation prevents issues like poor drainage or shifting turf.
In this guide, you’ll find clear, practical instructions on how to lay artificial grass on soil, plus maintenance tips and answers to common questions.
Can I lay artificial turf directly on soil?
Many people wonder if they can skip the groundwork and install turf straight onto soil. Technically, yes — it’s possible, but it comes with problems down the road.
Without a proper base, the soil can shift, settle, absorb water unevenly, and allow weeds to grow through the turf backing. Over time, the surface becomes uneven, puddles may form, edges may lift, and your lawn’s lifespan will shorten.
So while it might seem easier at first, the smart move is to prepare a solid foundation — ensuring a smooth, durable, and natural-looking finish.
What you’ll need before laying fake grass on soil
Having everything ready will make your installation smoother and more efficient. Here’s a checklist of tools and materials to prepare before you start.
Tools & equipment:
- Shovel/spade, rake, and hammer
- Wheelbarrow
- Plate compactor or hand tamper
- Sod cutter
- Utility knife/carpet knife
- Measuring tape, chalk line or string
- Stiff broom/power brush
- U-shape nails or landscape pins
- Gloves
Materials & supplies:
- Weed control membrane/geotextile fabric
- Crushed stone/aggregate (e.g. MOT Type 1)
- Sharp sand or granite dust
- Artificial grass rolls/turf
- Joining tape and turf adhesive
- Infill (washed silica sand, polymeric sand, or pet-safe infill)
- Edging materials (timber, plastic, or metal — optional but recommended)
Note: Plate compactor, sod cutter, and power brush can usually be rented from local hardware stores or garden centers.
Step-by-Step: How to lay artificial grass on soil
Laying artificial grass on dirt isn’t overly complicated, but each stage matters. The following step-by-step guide outlines the standard process used by professionals and experienced installers — so you’ll understand exactly what goes into a quality installation, whether you do it yourself or hire a team.
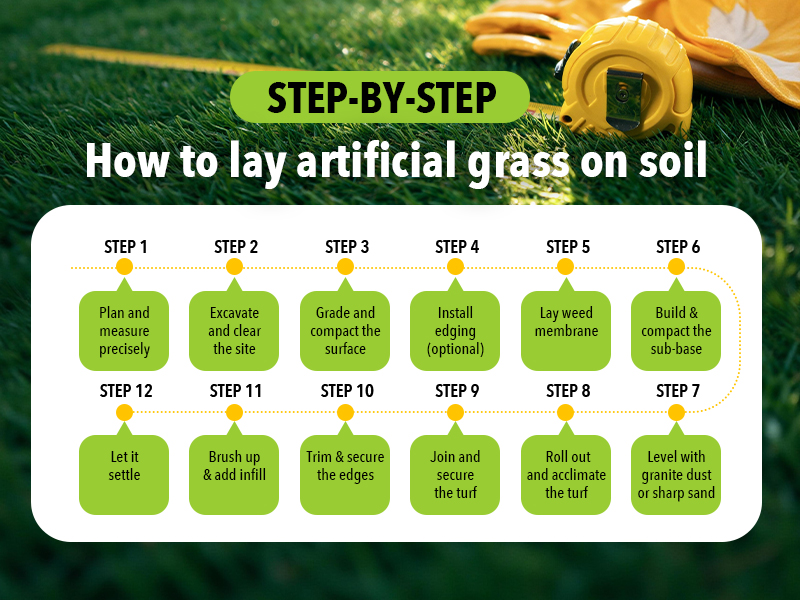
Step 1: Plan and measure precisely
Outline your area with string or chalk, accounting for curves and obstacles. Measure length x width for total sq ft, adding 5-10% for cuts. Sketch seams (minimize for seamless look) and note a 1-2% slope for drainage. Order materials accordingly—use apps for quick calcs.
Step 2: Excavate and clear the site
Mow the existing grass low, then remove 2–4 inches (50–100 mm) of topsoil (more in clay or cold areas) using a sod cutter or spade. Rake out roots, rocks, and debris, and apply eco-friendly weed killer if weeds are rampant.
Step 3: Grade and compact the surface
Once the area is cleared, level the soil using a rake to smooth out any dips or high spots. Lightly water the surface to help the soil settle, then compact it with a plate compactor or hand tamper. Walk over smaller areas if a compactor isn’t available. Aim for firm, even soil that holds its shape underfoot.
Step 4: Install edging (optional)
If you use edging (timber, metal strips, or concrete kerbs), install it at this stage. Edging holds turf edges tight, defines shape, and prevents side movement. Ensure the top of the edging sits slightly above the final turf level.
Step 5: Lay weed membrane
Roll out a permeable weed control fabric across the excavated area. Overlap seams by 4 inches (100 mm). This helps prevent weeds from migrating upward while letting water flow freely.
Step 6: Build & compact the sub-base
Add a layer of crushed stone or aggregate. For most garden installations, aim for a depth of 2–3 inches (50–75 mm); for high-traffic or poor-draining areas, increase to 3–4 inches (75–100 mm).
Spread evenly with a rake, lightly mist with water, then compact thoroughly using a plate compactor. Make several passes until the surface feels firm and stable underfoot — it shouldn’t move or “bounce” when stepped on.
Step 7: Level with granite dust or sharp sand
Add a ⅜–½ inch (10–15 mm) layer of granite dust (preferred for its stability and drainage) or sharp sand. Use a rake or straightedge to smooth the surface and maintain a slight slope for runoff.
Compact gently to create a firm but slightly yielding base. Check with a straight board — the surface should be smooth and even, free of dips or ripples.
Step 8: Roll out and acclimate the turf
Unroll the turf directly over your prepared base, ensuring all rolls face the same pile direction for a consistent look. Let it sit in the sun for 1–2 hours to relax and expand — this helps reduce wrinkles and ease installation.
Trim rough shapes with a utility knife from the backing side, being careful not to slice into the fibers.
Step 9: Join and secure the turf
Trim away any factory edge strip so the turf edges align neatly. Fold back the edges along the seam line and position the joining tape (smooth side down) underneath. Apply adhesive evenly along the tape, then press the turf edges firmly into place from one end to the other.
Walk along the seams a couple of times to ensure the joints are fully pressed down, and secure them with U-shaped nails every 6–12 inches (150–300 mm) for extra stability.
Step 10: Trim & secure the edges
Trim the excess turf along the perimeter and carefully shape it around corners, trees, or other irregular areas for a neat, precise fit. For more detailed cutting tips, check out our guide on How to Cut Artificial Grass.
Finally, gently pull the turf outward while securing the edges with landscape pins every 8–12 inches (200–300 mm). This helps the turf stay flat, wrinkle-free, and gives it a professional, finished appearance.
Step 11: Brush up & add infill
Use a stiff broom to brush the turf against the grain, lifting the blades upright. Apply infill gradually and spread it evenly — this helps weigh the turf down and support the fibers.
Brush once more to settle the infill, then lightly hose the surface to confirm drainage and remove dust. For larger areas, a power brush can make the process faster and more consistent.
Step 12: Let it settle
Allow the turf to rest for 24–48 hours to let the adhesive and infill settle properly before walking on it or placing any objects.
Do a quick final check — ensure the surface is smooth, top up infill in any low spots, and make sure the edges stay tidy. Once it’s fully settled, your new lawn is ready to enjoy.
How to maintain artificial grass
Even though artificial turf is marketed as low-maintenance, following a simple care routine helps it look fresh and last longer.
- Regular brushing: Periodically brush against the grain to keep fibers upright and avoid matting.
- Remove debris: Use a leaf blower or soft rake to clear leaves, twigs, and litter.
- Rinse occasionally: Hose down the turf as needed—typically once a week or after heavy use—to remove dust, pollen, spills, and keep the surface clean and fresh.
- Pet upkeep: Rinse pet areas with water. Use enzyme cleaners for odours and pick up solid waste promptly.
- Refill infill: Over time, infill can settle or shift. Check annually and top up if fibers begin flattening.
- Edge checks: Inspect turf edges for lifting and re-secure pins if needed.
For detailed guidance, check out our comprehensive article How to Clean Artificial Grass
FAQs about installing artificial grass on dirt
Can I install artificial grass on top of natural grass?
No, installing artificial grass directly over natural grass can cause uneven surfaces, poor drainage, and weeds pushing through the backing. For best results, remove the lawn and excavate 2–4 inches of topsoil before building a solid base.
Do you need underlay for artificial grass?
Underlay isn’t usually required when installing fake grass on soil, but it’s useful on hard surfaces like concrete to add cushioning and prevent wear. A foam shock pad is ideal for play areas, providing extra softness and extending the turf’s lifespan.
What is the cheapest way to lay artificial grass?
The cheapest way to lay fake grass is to install it yourself using local base materials, simple edging, and rented tools instead of professional labor. Focus on efficient site prep and cost-effective turf selection to cut costs without sacrificing durability.
Learn practical, step-by-step savings in our full guide: The Cheapest Way to Lay Artificial Grass
Does artificial grass increase home value?
Yes — installing high-quality synthetic turf can improve curb appeal and reduce landscaping maintenance. It’s often seen as a desirable feature, especially in drought-prone areas, and may make a property more appealing to potential buyers.
What is the best time of year to lay artificial grass?
Spring or fall (50–80°F / 10–27°C) is ideal for laying artificial grass. Mild, dry conditions allow adhesives to set properly and prevent the turf from wrinkling or buckling as it expands in heat and contracts in cooler temperatures.
How long does artificial grass last?
Quality artificial grass typically lasts 8 to 15 years. The exact lifespan depends on the turf quality, installation standard, foot traffic, and maintenance routine. With high-quality materials, proper installation, and regular care, residential lawns with moderate use can stay in good condition for over 12 years.
DIY vs Professional Installation
| DIY | Professional | |
| Cost | Lower (materials + tool rentals, saves on labor) | Higher but all-inclusive |
| Time | 1-3 days (weekend project) | 1 day (hands-off for you) |
| Tools | Rent/buy basics | All provided |
| Finish quality | Solid results with patience, tweaks possible | Clean, seamless finish |
| Best for | Small yards, DIY enthusiasts | Large/complex areas, time-crunched owners |
If you’re confident and patient, a DIY install is very doable. But for large or complex areas, professionals bring efficiency and polish you may not replicate easily.
Final thoughts
Knowing how to install artificial grass on soil is the first step toward creating a durable, sustainable, and attractive synthetic lawn. By following the proper steps, you can transform any space into a space that’s strong, tidy, and truly inviting. Imagine a clean, evergreen area—perfect for play, pets, and relaxation—free from mud, mowing, and mess.
As a leading manufacturer of high-quality synthetic turf, we supply durable, factory-direct artificial grass to wholesalers, distributors, contractors, and home improvement retailers worldwide. If you are looking for professional guidance or a reliable artificial turf supplier, CCGrass is here as your trusted partner.
Contact us at [email protected] or call +86 25 6981 1666 for personalised advice or bulk orders.
